Metals, Oxides, and Light, Oh My!
Jewelers In Spaaaaace.
Er, no, hmmm. But if you’re not mentally thinking “PIGS IN SPAAAAACE“1https://www.youtube.com/watch?v=EmI77ZBeJrQ just leave now, you’re dead to me. Go on. Go. I said good day.
Still here? Ok, how about: “Jewelers using space metals.” Erp, not quite right.
“Jewelers using metals that are used by space people2https://www.spacematdb.com/spacemat/manudatasheets/TITANIUM%20ALLOY%20GUIDE.pdf?” Closer.
Anyhoot, we’re here to talk about two metals — titanium and niobium — how they form oxides, and how light then interacts with the oxides to produce the colors our human eyes see. “Metals, oxides, and light, oh my!?”
Yeah, that’s it.
Let’s get to it.
Reactive Metals
What is a reactive metal? Any metal that responds to air, water, or other items by changing one or more aspects — such as create a gas, burst into fire, or (and here’s the one we’re interested in) grow an oxide layer.
While there are many reactive metals, aluminum, titanium, and niobium are the most common that would be used by an artist or metalsmith due to their availability, affordability, and colorability. These metals react naturally at ambient temperatures with the oxygen in the air to form an oxide layer which then helps to protect the metal and make it more durable.
Aluminum (Al)
3https://www.rsc.org/periodic-table/element/13/aluminiumDo What: Dye the oxide to the desired color and actually convert some of the aluminum into a thicker oxide layer.4https://www.youtube.com/watch?v=3ZhVOy-ytJY&list=RDCMUC2bkHVIDjXS7sgrgjFtzOXQ&start_radio=1&t=213
How: Suggested processes use lye to prep the pieces, then bathe them in battery acid with dual cathodes to oxidize the pieces, and then apply dyes to create the color.
And that’s as much as we’re going to talk about aluminum. If you’re interested in learning more, here are some links to get you started: write up5https://www.wikihow.com/Anodize-Aluminum, write-up6http://www.homemetalshopclub.org/news/16/anodizing.pdf, video7https://www.youtube.com/watch?v=P8oesBi7_II. Otherwise, just keep in mind that while aluminum can be colored like titanium and niobium the process steps, chemicals, and what’s happening to the metal are all different.
Titanium (Ti) and Niobium (Nb)
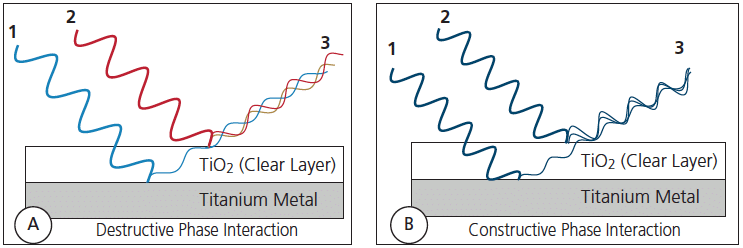
Do What: Manipulate the thickness of the oxide layer to obtain a certain thickness which changes how the light refracts which in turn changes the color we see. Light hits the oxide layer, and some bounces off while the rest continues through to the metal before bouncing. The thickness of the oxide layer impacts the spacing between those rays resulting in destructive or constructive phase interactions8https://decisionsindentistry.com/article/esthetic-anodization-orthodontic-archwires/; it’s the constructive phase interference that spills the rainbow all over.
How: Suggested processes use an acid etch first, then heat with a torch/kiln or bathe in an electrolyte solution with a single cathode to create the oxide layer — the heat/voltage and the length of time exposed both impact the resultant color you’ll see. Both metals have the same color ranges and progressions (more on this later) though the niobium might take more heat or a higher voltage to achieve the same target color.
Under normal conditions it will only form to a thickness that gives us the “natural” silvery-gray color of the metal. However, upon exposure to air it is immediately too thick to allow for creating joins in an oxygenized (oxygenated?) atmosphere.
Easy: budget and workability trade-offs.
Titanium is the less expensive option, being more on par with base metals (e.g. brass, copper) cost-wise, and is the more difficult one to work in terms of shaping, forming, and joining*.
Niobium is the more expensive option, being more on par with lower-cost precious metals (e.g. silvers (sterling, fine, Argentium®)), and is the easier of the two to work in terms of shaping, forming, and joining*.
A commonality: they are hypoallergenic16https://catlogix.com/pages/what-metals-are-hypoallergenic.
A difference: Titanium has a song17https://www.youtube.com/watch?v=KxnpFKZowcs. Niobium doesn’t. Singing along with the song in your head yet?
See more comparisons18https://www.differencebetween.com/difference-between-niobium-and-titanium/.
Even though we’ve barely scratched the surface of the sciencey stuff we’re not delving more deeply than that here. If you want to learn more check out The Thought Emporium’s video Why is Titanium so Colorful?19https://youtu.be/O2RaIJhZ81I?t=367 (this is set to start at to the 6:07 minute mark for a quick summation of the “how” as well as the “why”) and/or Mr. Titanium’s write-up20http://mrtitanium.com/?infoTab=Anodized+Colors and/or the earlier space people link. Or check out PTable21https://ptable.com/ for fun (yes, fun!) with the periodic table. Or check out this 1966 technical report22https://apps.dtic.mil/dtic/tr/fulltext/u2/633986.pdf. Or follow any of the subsequent links or references. Or scour the internet for yourself. Or go to the library. Or nag your science teacher. Or. Or. Or. Your options are almost endless.
Oxidize to Colorize
While an item can be oxidized without significantly changing its color, we’re (at least I’m) here because we want color! Color! COLOR! A possible resultant color range and progression is shown in the image below.23https://en.wikipedia.org/wiki/Anodizing Purty, isn’t it?
 TiCPU, CC BY-SA 3.0, via Wikimedia Commons24https://commons.wikimedia.org/wiki/File:Anodized_titanium_colors.svg
Why? Because of all the maybes. Maybe this, maybe that, maybe the other (more on this later). Too many variables have to work together to be able to say if this volt then that color. So the best I can suggest is (a) by all means do look for charts but note particularly how they all differ and (b) each do our own experimentation and form our own repeatable processes so we have our own personal reference chart that could be fairly reliable.
Growing the Oxide Layer
There are two basic options for growing the oxide layer: anodization (electricity) or heat. The higher the voltage or temperature, the thicker the oxide layer that forms, and the further right the color goes on the progression scale. Both options use the same basic steps – clean, rinse, etch, rinse, oxidize, and one last rinse. Click the process image below for a larger version.
Anodizing
 What is anodizing? “Anodizing is an electrochemical process that converts the metal surface into a decorative, durable, corrosion-resistant, anodic oxide finish.”25https://www.anodizing.org/page/what-is-anodizing
Anodizing allows for more precise control than when using heat.
Use a DC Power Supply where you can adjust both amperage and voltage. Set your amperage based on the size of the piece(s) being anodized at the same time. [I need to find this calculation & reference again!]
Color changes start at around 5 – 30 ish volts and stop at 90 – 200+ ish volts, depending on the internet source. I personally think the stop and start ranges are broad because the overall thickening of the oxide layer can be impacted by many things during the different steps of the process.
If you’re not getting the results you’re expecting, or not getting the results you got before doing “exactly the same thing”, check your maybes.
The Maybes
- Maybe the piece was still greasy or dirty. Especially likely if the color is unintentionally splotchy or mottled. Clean it and try again.
- Maybe the acid etch is “spent” (no longer effective). Mix a fresh batch and try again. The chemicals you use can make a difference26https://www.youtube.com/watch?v=s9TvsGAFAg8&t=4s in the color achieved.
- Maybe the piece was exposed to air too long in between the acid etch and the holding bath. Get the piece into the distilled water rinse as quickly as possible after etching. Is the water dirty? Change it and try again.
- Maybe the piece was exposed to air too long in between the holding bath and the electrolyte bath. Get the piece in the electrolyte solution as quickly as possible after the prior step. Stop stopping to take pictures. OK, maybe that’s just me. :0)
- Maybe the electrolyte solution is spent. Mix a fresh batch and try again.
- Maybe the piece wasn’t in the electrolyte solution long enough/too long. If you didn’t reach the desired color on the progression, put it back in or start over and try again. If you went past that color, start over. The color change can be pretty quick, but it will also continue to progress for a bit if the piece is left in the solution.
- Maybe what felt like 10 seconds every time was really 15 or 5 and it just needs more (or less) time.
- Maybe the surface finish differed. The finish can make a difference27https://www.youtube.com/watch?v=e_G0N2SgKBc&t=9s in the color achieved.
- Maybe the voltage was too high. Or too low. Or wasn’t steady enough. Watch your voltage meter before you put the piece into the electrolyte solution and while the piece is in there. If it’s jumping around take the piece out, check your connections, then try again.
- Maybe the current was too weak. Or too strong. Or wasn’t steady enough. Too low a current and the piece might not color, too high and it might burn out or create hot spots.
- Maybe the grade of metal differed.
- Maybe the alloy of the metal differed.
- Maybe some other defect or process step in or out of your control went wonky. Yup, that’s a technical term. Here’s a listing of potential defects found in ALUMINUM processing28http://www.defects.qualanod.net/9.html, along with some things to look for to correct them. I hesitated to link to that here as this post focuses on anodizing titanium and niobium, but I’ve yet to run across anything similar for these metals. Some of the issues will be the same across the metals, though their exact cause and cure might differ for titanium or niobium. Use at own risk; YMMV.
- Maybe, just maybe, you held your mouth wrong. This one comes from a saying my mother utters from time to time. It’s possible.
Heat
Using heat produces more organic results than when using electricity. It’s more touchy-feely and less repeatable (and therefore possibly produce more one-of-a-kind and unique results and/or fun than when using electricity?). Keep in mind that the process requires oxygen, so you’ll need to move the flame off the piece from time to time to give it a chance to change color so you can check its progression through the spectrum. “They” also say to stop at the color *before* the color you want, because — like meat that continues to increase in temperature after you remove it from the smoker (or grill, or oven) — the metal will continue to warm a few moments/seconds after you remove the heat source so might progress further through the colors as well. So, it might take practice before you can hit the desired color at will. How much practice? A day? A week? Perhaps a lifetime? If you’ve heat-tempered metal before, you’re probably an old hand at removing the heat just before the “right” color arrives.
BTW, some on the internet say that heating niobium will only produce a grayish/black color, not the rainbow colors.29https://www.ganoksin.com/article/creating-colorful-jewelry-designs-reactive-hues/ I haven’t found as much on niobium as titanium, but other sources have not mentioned the lack of colors with heating, however, those were focused on electric vs heat anyhow.
Regardless, you won’t be creating human-touch-driven mood devices when working with either of these metals. Human body temperature is not high enough to change the oxide thickness and thus impact the color. But your cookware might be moody while you’re making dinner30http://www.22titanium.com/do-you-know-that-titanium-will-change-color/!
Color changes start at around 392°F (200°C ) and stop at around 1652°F (900°C ). Titanium melts around 3038°F (1670°C) and niobium around 4491°F (2477°C) but don’t try to melt either of them (say, for casting) as you might end up dissolving your tools, your bench, and who knows what!
re: Titanium specifically: “At present, consumable vacuum arc melting offers the only suitable commercial method of producing titanium castings. The rapid contamination of titanium at elevated temperature by oxygen and nitrogen and the severe damage to ductility by small percentages of such contaminants requires that the melting of titanium be done in the absence of air. Because liquid titanium is an extremely effective solvent, problems of containing the molten metal within a crucible during the melting operation are encountered.”31Warren Lee , “Titanium Casting with Sand Foundry Techniques” , Journal of Vacuum Science and Technology 8 , VM38-VM38 (1971) https://doi.org/10.1116/1.1315401
Read more about heating with a torch32https://www.ganoksin.com/article/coloring-titanium-sculptures-torch/ and/or watch this video33https://www.youtube.com/watch?v=loYrpDhUgCY.
One? Or Two? Or more?
Single Color – heat or electrify the entire piece to the same color.
Multi-Colored – heat or electrify different portions of a piece to differing temperatures/voltages. How?
- Dip, then expose LESS of the piece to a gradually HIGHER temperature/voltage, repeat as desired until you reach the highest temperature/voltage desired.
- Mask portions, expose to highest temp/volt desired, unmask and expose to lower heat/temp. OR expose the entire piece to the highest desired temp/volt, then remove (sand, etch, etc) portions of that oxide layer and expose to lower heat/temp.
- Bath or dip, then etch, sand or polish away portions of the color piece to expose the metal again, recolor to a lower temperature/voltage.
- Painting — Rio Grande’s website has a great video about coloring via a dip/bath vs. using an applicator34https://www.youtube.com/watch?v=Zdb89lkNXeY, by Bill Seeley.*
- Splashing
- OR, OR, OR … whatever your heart desires!
* Btw, Bill’s company, Reactive Metals Studio, Inc35https://www.reactivemetals.com/, is currently the only U.S.A.-based source for the Arizona-based company Multi-Etch’s36https://www.multietch.com/ product by the same name which is a low-acid (pH 6.8) alternative to hydrofluoric acid which had previously been the go-to etch product. (It’s available worldwide, see the Multi-Etch site for distributors.If you’re in Europe, Titan Etch might also be an option for you.) He’s also been working with reactive metals for a Very Long Time and has some great tools and references available, and galleries (linked below) (and no, there are no affiliate links in this post).
Things to Remember
- Always follow standard and specified (by respective manufacturer) safety precautions when working with metal, chemicals, electricity, and/or fire.
- Once you pass a color on the spectrum using heat or electricity, you can’t go backward.
- You can, however, acid wash and/or abrade the surface to remove the oxide layer and start over if you don’t like the result. The limitation on doing that over and over is the thickness and delicacy of the piece — how much rework it will stand?
Oh, oh, oh, I almost forgot the WHY of it all …
because: pretty37https://www.reactivemetals.com/gallery-1, pretty38https://www.reactivemetals.com/gallery-2, pretty39https://www.reactivemetals.com/gallery-3.
Footnotes
- 1https://www.youtube.com/watch?v=EmI77ZBeJrQ
- 2https://www.spacematdb.com/spacemat/manudatasheets/TITANIUM%20ALLOY%20GUIDE.pdf
- 3https://www.rsc.org/periodic-table/element/13/aluminium
- 4https://www.youtube.com/watch?v=3ZhVOy-ytJY&list=RDCMUC2bkHVIDjXS7sgrgjFtzOXQ&start_radio=1&t=213
- 5https://www.wikihow.com/Anodize-Aluminum
- 6http://www.homemetalshopclub.org/news/16/anodizing.pdf
- 7https://www.youtube.com/watch?v=P8oesBi7_II
- 8https://decisionsindentistry.com/article/esthetic-anodization-orthodontic-archwires/
- 9https://www.rsc.org/periodic-table/element/22/titanium
- 10https://www.ulbrich.com/blog/titanium-facts-characteristics-manufacturers-guide/
- 11https://www.ganoksin.com/article/understanding-the-working-titanium/
- 12https://www.ganoksin.com/?s=titanium
- 13https://www.rsc.org/periodic-table/element/41/niobium
- 14http://www.cradleresources.com.au/projects/what-is-niobium/
- 15https://www.ganoksin.com/?s=niobium
- 16https://catlogix.com/pages/what-metals-are-hypoallergenic
- 17https://www.youtube.com/watch?v=KxnpFKZowcs
- 18https://www.differencebetween.com/difference-between-niobium-and-titanium/
- 19https://youtu.be/O2RaIJhZ81I?t=367
- 20http://mrtitanium.com/?infoTab=Anodized+Colors
- 21https://ptable.com/
- 22https://apps.dtic.mil/dtic/tr/fulltext/u2/633986.pdf
- 23https://en.wikipedia.org/wiki/Anodizing
- 24https://commons.wikimedia.org/wiki/File:Anodized_titanium_colors.svg
- 25https://www.anodizing.org/page/what-is-anodizing
- 26https://www.youtube.com/watch?v=s9TvsGAFAg8&t=4s
- 27https://www.youtube.com/watch?v=e_G0N2SgKBc&t=9s
- 28http://www.defects.qualanod.net/9.html
- 29https://www.ganoksin.com/article/creating-colorful-jewelry-designs-reactive-hues/
- 30http://www.22titanium.com/do-you-know-that-titanium-will-change-color/
- 31Warren Lee , “Titanium Casting with Sand Foundry Techniques” , Journal of Vacuum Science and Technology 8 , VM38-VM38 (1971) https://doi.org/10.1116/1.1315401
- 32https://www.ganoksin.com/article/coloring-titanium-sculptures-torch/
- 33https://www.youtube.com/watch?v=loYrpDhUgCY
- 34https://www.youtube.com/watch?v=Zdb89lkNXeY
- 35https://www.reactivemetals.com/
- 36https://www.multietch.com/
- 37https://www.reactivemetals.com/gallery-1
- 38https://www.reactivemetals.com/gallery-2
- 39https://www.reactivemetals.com/gallery-3